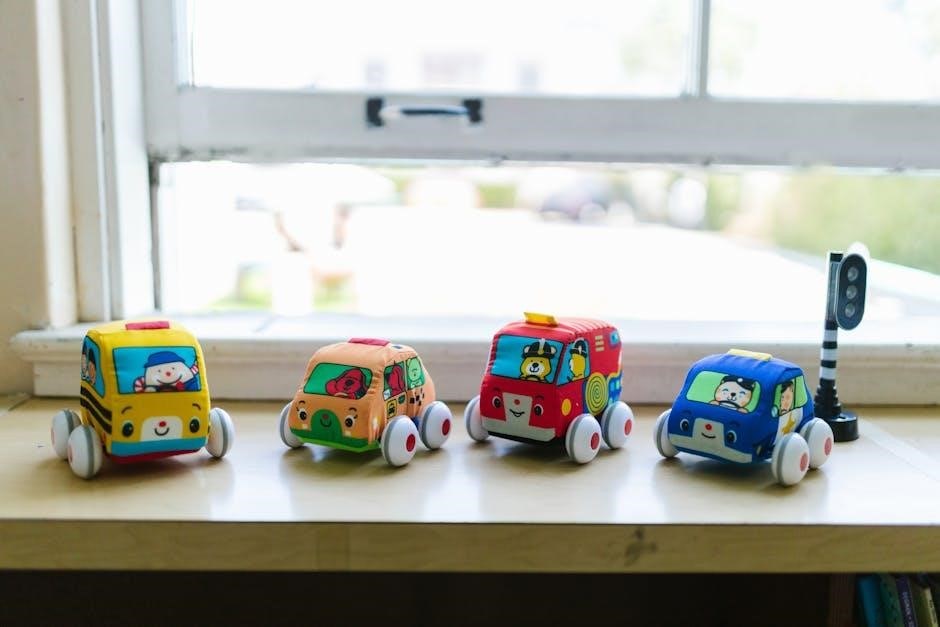
The VTech Go! Go! Smart Wheels 4-in-1 Zig-Zag Raceway offers versatile fun for little racers, featuring four configurations: battle, stunt, zig-zag, and super ramp!
This interactive playset encourages learning through revved-up responses, SmartPoint interactions, and exciting track transformations, providing hours of engaging play.
Overview of the Toy
The VTech Go! Go! Smart Wheels 4-in-1 Zig-Zag Raceway is a dynamic playset designed to captivate young children with its interactive features and adaptable track layouts. This toy isn’t just about racing; it’s about exploration and development.
It boasts four distinct configurations – Battle Raceway, Stunt Raceway, Zig-Zag Track, and Super Ramp – offering varied gameplay experiences. SmartPoint locations trigger sounds, music, and educational phrases, enhancing the learning aspect. The raceway encourages fine motor skill development and imaginative play, making it a valuable addition to any child’s toy collection.
Target Age and Developmental Benefits
The VTech Go! Go! Smart Wheels 4-in-1 Zig-Zag Raceway is ideally suited for children aged 18 months and up, fostering crucial developmental skills during early childhood. The interactive elements stimulate auditory and visual senses, while manipulating the track pieces enhances fine motor skills.
Gameplay encourages problem-solving as children experiment with different configurations. The SmartPoint technology introduces early learning concepts like colors, numbers, and first words, all within a fun and engaging racing environment, promoting cognitive development.
Unboxing and Component Identification
Upon opening the VTech Go! Go! Smart Wheels 4-in-1 Zig-Zag Raceway, carefully inspect all included parts to familiarize yourself with the raceway’s components before assembly.
Ensure all pieces listed in the manual are present for a complete and enjoyable building experience.
List of Included Parts
The VTech Go! Go! Smart Wheels 4-in-1 Zig-Zag Raceway typically includes several key components. These are the base components (labeled A & B), multiple zig-zag track sections for varied layouts, and potentially ramp pieces for the super ramp configuration;
Additionally, you’ll find a SmartPoint vehicle to activate interactive features, and instructions for different track setups. Verify all parts are present before beginning assembly, referencing the parts list within the included manual for confirmation.
Identifying SmartPoint Locations
SmartPoint locations are crucial for interactive play on the VTech Go! Go! Smart Wheels 4-in-1 Zig-Zag Raceway. These designated areas, typically three or more, are marked on the track and activate sounds, music, first words, and phrases when a SmartPoint vehicle passes over them.
Look for distinct icons or colored areas on the track to easily identify these activation zones, enhancing the learning experience with engaging responses related to feelings and stunts.
Assembly Instructions: Core Raceway
Begin assembling the core raceway by securely connecting the base components, labeled A and B, as illustrated in the instruction manual for a stable foundation;
Ensure a firm connection before proceeding to attach the zig-zag track sections, creating the initial racing path.
Attaching Base Components (A & B)
To begin the assembly, carefully locate base components A and B. Insert component B into component A, ensuring a snug and secure fit as depicted in the instruction manual. This forms the foundational structure of the entire raceway system.
Apply gentle pressure to confirm a stable connection; avoid forcing the pieces. A properly connected base is crucial for the subsequent attachment of track sections and overall raceway stability, guaranteeing a fun and safe play experience for your child.
Connecting the Zig-Zag Track Sections
Once the base is assembled, carefully attach the zig-zag track sections. Align the connectors on each section, gently pressing them together until you hear a click, indicating a secure connection. Ensure each section is firmly in place to prevent derailments during racing action.
Pay attention to the track’s orientation to create the signature zig-zag pattern. A stable track is essential for smooth car movement and maximizing the excitement of the 4-in-1 Zig-Zag Raceway experience.

Transforming the Raceway: Configuration Options
The 4-in-1 Raceway offers exciting versatility! Easily switch between Battle, Stunt, Zig-Zag, and Super Ramp modes for varied play experiences and endless fun.
Reconfigure the track to match your child’s preference, promoting creativity and adaptable play patterns.
Battle Raceway Setup
To create the Battle Raceway, insert component B into component A as illustrated in the instruction manual. This configuration features a thrilling head-to-head race where two cars compete!
Cars are propelled past a bumper, where the two ramps converge into one final showdown. This setup encourages friendly competition and provides a dynamic racing experience for young children. It’s a fantastic way to introduce the concept of racing and taking turns.
Stunt Raceway Configuration
For the Stunt Raceway, position the Smart Wheels car at the very top of the zig-zag track. Watch as it navigates a series of exciting back-and-forth movements on its descent!
This configuration showcases thrilling stunts and provides visual excitement for little ones. The zig-zag design creates a dynamic and unpredictable path, enhancing the play experience and encouraging repeated play. It’s a simple yet captivating setup.
Super Ramp Mode Instructions
To create Super Ramp Mode, reconfigure the track to feature a long, sweeping ramp. This allows the Smart Wheels car to gain significant speed as it races downwards, providing a thrilling experience.
Ensure the ramp is securely connected for optimal performance. This configuration emphasizes speed and momentum, offering a different type of racing fun. It’s a quick transformation for varied gameplay!

Interactive Features and Gameplay
The raceway’s SmartPoint locations trigger sounds, music, phrases about feelings, and cool stunts when a SmartPoint vehicle passes over them, enhancing play!
SmartPoint Activation and Responses
SmartPoint locations are strategically placed throughout the 4-in-1 Zig-Zag Raceway, offering interactive responses as compatible Smart Wheels vehicles zoom across them. These designated areas trigger a delightful array of sounds, upbeat musical tunes, and engaging phrases.
Specifically, the SmartPoint system introduces early learning concepts like feelings and exciting stunt descriptions, enriching the play experience. Each activation provides positive reinforcement and encourages continued exploration of the track’s features.
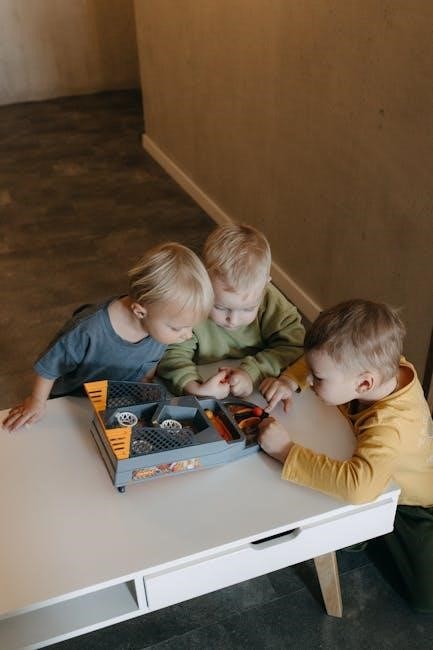
Racing with Multiple Cars
The Zig-Zag Raceway truly shines when multiple Smart Wheels cars are in play! The Battle Raceway configuration allows for head-to-head competition, with cars colliding at the bumper before a final showdown on a shared ramp.
Kids can enjoy simultaneous racing, fostering social interaction and friendly competition. Sending two cars down the track simultaneously amplifies the excitement and provides extended entertainment for young racers.
Troubleshooting Common Issues
If a car isn’t responding, ensure fresh batteries are installed correctly. For track sections not connecting, firmly press until they click securely into place.
Car Not Responding
If your Smart Wheels car isn’t responding, the first step is to verify the battery installation. Open the battery compartment (typically located on the car’s underside) and ensure the batteries are inserted with the correct polarity (+ and -).
Replace the batteries with fresh ones, even if the current ones seem partially charged. Sometimes, low battery power can cause intermittent or complete failure. Also, confirm the battery contacts within the compartment are clean and making good contact with the batteries.
Track Sections Not Connecting Securely
If track sections aren’t connecting firmly, carefully inspect the connecting points for any obstructions like small debris or packaging remnants. Ensure you’re aligning the sections correctly, as they often have a specific orientation for proper attachment.
Apply gentle but firm pressure when joining the pieces. Avoid forcing them, as this could damage the connectors. If the issue persists, double-check that you’re using the correct track pieces for the chosen configuration, as some are specific to certain setups.
Safety Precautions
Adult assembly is required to ensure proper construction and a safe play environment for your child. Be mindful of small parts, presenting a choking hazard.
Adult Assembly Required
Prior to allowing a child to play with the VTech Go! Go! Smart Wheels 4-in-1 Zig-Zag Raceway, complete assembly is absolutely essential. This ensures all components are securely connected, preventing potential hazards. Carefully follow the provided instructions, inserting parts as illustrated.
Do not allow children to assist with assembly, as this could lead to improper construction or the presence of loose pieces. A fully assembled raceway guarantees a safer and more enjoyable play experience for your little one.
Small Parts Warning
This toy contains small parts that could present a choking hazard for children under three years old. Adult supervision is crucial during play to prevent accidental ingestion of any detached components. Regularly inspect the raceway for loose pieces and immediately remove them from the play area.
Keep small parts out of reach of young children. The VTech Go! Go! Smart Wheels 4-in-1 Zig-Zag Raceway is designed for ages 18 months and up, ensuring appropriate developmental readiness.
Battery Installation and Replacement
The VTech Smart Wheels Raceway requires batteries for operation of its interactive features. Ensure correct polarity when installing batteries in the designated compartment.
Regular battery checks and replacements will maintain optimal performance and continued fun for your little racer!
Battery Type Required
The VTech Go! Go! Smart Wheels 4-in-1 Zig-Zag Raceway operates using two AAA batteries. These are standard alkaline batteries, readily available at most retail stores. It’s recommended to use new, high-quality batteries for the best performance and longevity of the interactive features within the playset.
Avoid mixing old and new batteries, or different types of batteries, as this can damage the toy or reduce its functionality. Always follow the safety guidelines when handling and installing batteries.
Battery Compartment Location
The battery compartment for the VTech Go! Go! Smart Wheels 4-in-1 Zig-Zag Raceway is located on the underside of the main base component (Part A). You’ll find a secure battery door with a screw closure for safety.
Use a Phillips head screwdriver to open the door, insert the two AAA batteries as indicated by the polarity markings (+ and -), and securely close the compartment. Ensure the screw is tightened to prevent accidental opening.
Cleaning and Maintenance
To clean the raceway, wipe down the track and components with a damp cloth. Avoid abrasive cleaners, and ensure everything is fully dry before storage.
Store the set in a cool, dry place to maintain its functionality and longevity for continued playtime enjoyment.
Cleaning the Track and Components
Maintaining the VTech Go! Go! Smart Wheels 4-in-1 Zig-Zag Raceway is simple! Regularly wipe down all track pieces and components with a slightly damp cloth to remove dust and debris.
Avoid using harsh chemical cleaners or abrasive materials, as these could damage the plastic or affect the SmartPoint technology. Ensure all parts are completely dry before reassembling or storing the set. This will help preserve the vibrant colors and ensure continued smooth operation for your little racer!
Storage Recommendations
Proper storage of the VTech Go! Go! Smart Wheels 4-in-1 Zig-Zag Raceway extends its lifespan. When not in use, disassemble the track and store all components in a dry, cool place, away from direct sunlight.
Consider using a large storage bin or bag to keep all the pieces together and prevent loss. This also protects the parts from dust and damage, ensuring it’s ready for the next racing adventure!

Understanding the Smart Wheels Technology
SmartPoint technology brings the 4-in-1 Zig-Zag Raceway to life! Vehicles interact with SmartPoints, triggering sounds, music, and educational phrases for engaging play.
How SmartPoint Vehicles Interact
SmartPoint vehicles are the key to unlocking the interactive fun of the 4-in-1 Zig-Zag Raceway. As a SmartWheels car passes over a designated SmartPoint location on the track, it activates built-in sensors.
This activation triggers a delightful response – sounds, upbeat music, introductory first words, and engaging phrases related to feelings or cool stunt maneuvers are all possible. These responses enhance the play experience and provide educational value.
Educational Value of the SmartPoint System
The SmartPoint system within the 4-in-1 Zig-Zag Raceway fosters early childhood development in several key areas. Through interactive responses, children are introduced to new vocabulary, including first words and phrases.
The system also subtly teaches concepts like cause and effect, as vehicle movement directly triggers auditory feedback. Furthermore, the playful environment encourages emotional learning through phrases about feelings, boosting social-emotional growth.
Advanced Play Ideas
Expand the fun by creating custom track layouts and integrating other VTech Go! Go! Smart Wheels sets for a larger, more complex racing experience!
Encourage imaginative play and problem-solving skills as children design and rebuild the raceway to suit their racing adventures.
Creating Custom Track Layouts
Unleash creativity by disassembling and reassembling the 4-in-1 Zig-Zag Raceway into entirely new configurations! Experiment with different arrangements of the track sections, exploring unique pathways and challenges for the Smart Wheels cars.
Combine sections to build longer, winding tracks, or create elevated courses using household items (with adult supervision, of course!). Encourage children to design their own racing circuits, fostering problem-solving and spatial reasoning skills as they optimize for speed and excitement.
Incorporating Other Smart Wheels Sets
Expand the racing universe by seamlessly integrating the 4-in-1 Zig-Zag Raceway with other VTech Go! Go! Smart Wheels playsets! Connect tracks from the Car Wash, Fire Station, or other sets to create a sprawling Smart Wheels city.
Utilize compatible connectors to build elaborate roadways and introduce new interactive elements. Mix and match track pieces to design a personalized racing experience, maximizing play value and fostering imaginative storytelling with all your Smart Wheels vehicles!
Frequently Asked Questions (FAQ)
Is this set compatible with all VTech Go! Go! Smart Wheels vehicles? Replacement parts can be found on the VTech website or through customer support channels.
Compatibility with Other VTech Toys
The VTech Go! Go! Smart Wheels 4-in-1 Zig-Zag Raceway is primarily designed for use with other vehicles within the Smart Wheels line. These cars are specifically engineered to interact with the SmartPoint locations embedded throughout the track, triggering sounds and phrases.
While compatibility with other VTech toys isn’t a core feature, incorporating additional Smart Wheels sets allows for expanded track layouts and enhanced play experiences, fostering creativity and extended engagement for your little one.
Where to Find Replacement Parts
For replacement parts for the VTech Go! Go! Smart Wheels 4-in-1 Zig-Zag Raceway, the primary resource is the official VTech customer support website. They often stock frequently requested components like track pieces or connectors.
Additionally, online retailers such as Amazon and eBay may carry individual parts sold by third-party sellers. Checking online toy communities and forums can also reveal sources for hard-to-find pieces.

Warranty Information
VTech offers a warranty covering defects in materials and workmanship for the 4-in-1 Zig-Zag Raceway. Contact VTech customer support for details and claims.
Warranty length varies by region; retain your proof of purchase for efficient processing.
VTech Warranty Coverage
VTech’s warranty for the Go! Go! Smart Wheels 4-in-1 Zig-Zag Raceway covers defects in materials and workmanship under normal use. This warranty typically lasts for a specific period from the date of purchase, often 90 days, but can vary.
It does not cover damage from misuse, accidents, or unauthorized repairs. Proof of purchase is essential for any warranty claim. VTech may offer repair or replacement at their discretion.
Contacting VTech Customer Support
For assistance with your Go! Go! Smart Wheels 4-in-1 Zig-Zag Raceway, VTech offers multiple support channels. You can reach them via phone, typically with hours listed on their website.
Online support, including FAQs and a contact form, is also available. Their website provides detailed information and troubleshooting guides; Expect potential wait times during peak hours, and have your model number ready.