Welcome to the Viper 5706v installation guide, your comprehensive resource for successfully integrating this advanced remote start and security system into your vehicle. This manual provides detailed step-by-step instructions, essential safety precautions, and troubleshooting tips to ensure a seamless setup. Whether you’re a professional installer or a DIY enthusiast, this guide will help you maximize the system’s features and functionality. For optimal results, read this guide thoroughly before starting the installation process. Download the full PDF manual for offline reference.
Overview of the Viper 5706v System
The Viper 5706v is a cutting-edge remote start and security system designed to enhance vehicle safety and convenience. It features advanced technologies like virtual tach, manual transmission mode, and multiple sensors for reliable performance. The system includes remote start, alarm functions, and real-time monitoring capabilities. Its compact design and user-friendly interface make it a popular choice for vehicle owners seeking modern security solutions.
The Viper 5706v supports seamless integration with various vehicle types and offers customizable settings for personalized use. Equipped with state-of-the-art security features, it ensures maximum protection against theft and unauthorized access.
This system is ideal for drivers who value advanced security, convenience, and ease of use in their vehicles.
Importance of Proper Installation
Proper installation of the Viper 5706v system is crucial to ensure optimal performance, safety, and reliability. Incorrect wiring or setup can lead to system malfunctions, safety hazards, or damage to your vehicle. Following the installation guide carefully prevents issues like unauthorized starting or false alarms. Proper installation also ensures compliance with manufacturer guidelines, maintaining your vehicle’s warranty and guaranteeing the system’s advanced features function as intended for years to come. Always refer to the official manual for precise instructions.
Safety Precautions and Warnings
Before starting the installation, disconnect the vehicle’s battery to avoid electrical shocks or system damage. Ensure the vehicle is in park (automatic) or neutral (manual) gear. Never test the remote start function while the vehicle is in gear, as this can cause accidental movement. Avoid touching electrical components with sharp objects to prevent damage. If unsure about any step, consult a professional installer to ensure safety and proper functionality. Always follow the manufacturer’s guidelines.
System Components and Tools Required
The Viper 5706v system includes a control module, wiring harness, remote start, and alarm sensors. Essential tools are screwdrivers, wire cutters, and a multimeter for installation.
Unboxing and Inventory of Parts
Begin by carefully unboxing the Viper 5706v system and verifying all components are included. Expect the control module, wiring harness, remote start, alarm sensors, and user manual. Ensure no damage is visible. Check for additional accessories like mounting hardware and connectors. If any parts are missing or damaged, contact customer support immediately. This step ensures a smooth installation process and prevents delays. Read the manual to familiarize yourself with each component before proceeding.
Tools Needed for Installation
To successfully install the Viper 5706v system, gather the necessary tools: a screwdriver set, wire cutters, a multimeter, soldering iron, and a fuse tap. Additionally, T-tap connectors, electrical tape, and a drill may be required for wiring and sensor installation. Ensure all tools are readily available to streamline the process. Refer to the manual for specific requirements based on your vehicle’s setup. Proper tools ensure a safe and professional-grade installation.
Pre-Installation Setup
Pre-installation setup involves disconnecting the battery, consulting your vehicle’s manual, and ensuring all components are accounted for. This ensures a safe and organized start.
Vehicle Preparation
- Disconnect the negative battery terminal to ensure safety during installation.
- Turn off the ignition and all electrical accessories.
- Consult your vehicle’s manual to locate key wiring points and components.
- For manual transmissions, ensure the MTS Mode is set correctly.
- Park the vehicle in a well-ventilated area, applying the parking brake.
- Test the remote start after installation to confirm proper functionality.
This preparation ensures a safe working environment and proper system operation.
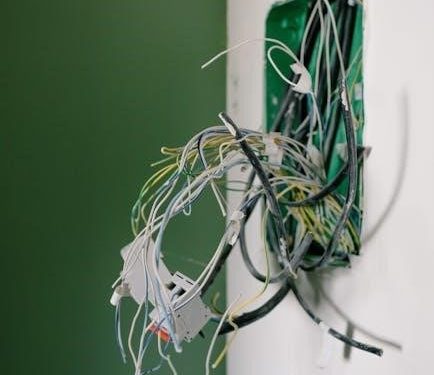
Understanding the Wiring Diagram
The wiring diagram is essential for proper installation, detailing connections between the Viper 5706v and your vehicle’s electrical system. It ensures functionality and safety, guiding you through the process accurately. Refer to it during installation to avoid errors and ensure all components integrate seamlessly.
- Identify control module connections to ignition, starter, and sensors.
- Match wiring harness to vehicle specs.
- Verify power and ground wires.
- Integrate optional features using the diagram.
- Double-check connections for reliability.

Installation Process
The Viper 5706v installation involves mounting the control module, connecting the wiring harness, and installing sensors. Follow the wiring diagram carefully to ensure proper connections and functionality. Begin with the control module, securing it in a suitable location. Next, connect the wiring harness, matching each wire to the correct terminal as per the diagram. Finally, install and program the remote start and alarm sensors, ensuring they are strategically placed for optimal performance. Test the system thoroughly to verify all features are operational.
Mounting the Control Module
Mounting the control module is a critical step in the Viper 5706v installation. Choose a secure, dry location away from moving parts and moisture. Use the provided screws or adhesive to firmly attach the module to the vehicle. Ensure the module is level and accessible for future adjustments. Connect the module to the wiring harness, following the diagram for proper terminal connections. Double-check all wires to prevent loose connections, which could cause system malfunctions. Refer to the PDF manual for detailed mounting instructions and diagrams.
Connecting the Wiring Harness
Connect the wiring harness to the control module, ensuring each wire is securely attached to the correct terminal. Refer to the wiring diagram in the PDF manual for proper connections. Match the colored wires to their corresponding functions, such as ignition, starter, and alarm outputs. Double-check all connections to avoid loose wires, which could cause system malfunctions. Use electrical tape or heat shrink to secure and protect the connections. Test the system to confirm proper functionality after wiring.
Installing the Remote Start and Alarm Sensors
Mount the shock sensor and tilt sensor in locations where vibrations and movement will be detected accurately. Connect the remote start brain to the vehicle’s ignition, starter, and alarm wires as per the wiring diagram. Ensure the sensors are synchronized with the control module by following the programming sequence outlined in the manual. Test the sensors to confirm they trigger the alarm and remote start features correctly. Secure all sensors firmly to avoid false triggers and ensure reliable system performance.
Configuring System Features
Configure the remote start and alarm functions according to your preferences by following the detailed instructions in the manual.
Programming the Remote Start
Programming the remote start feature ensures proper functionality and customization to your vehicle’s needs. After installation, enter programming mode by pressing the remote’s buttons in a specific sequence, as outlined in the Viper 5706v manual. Key steps include initializing the remote, setting the tachometer sensitivity, and testing the remote start operation. Ensure the vehicle is in park or neutral and the brake pedal is pressed during testing. Confirm successful programming with LED flashes or audible beeps. Refer to the manual for detailed instructions and troubleshooting tips to ensure a smooth setup.
Setting Up Alarm Functions
Configure the alarm functions to enhance your vehicle’s security. Enable shock sensor sensitivity, door, hood, and trunk triggers, and adjust the panic mode settings. Ensure all sensors are properly connected and test each feature to confirm functionality. Refer to the Viper 5706v manual for detailed instructions on customizing alarm responses and sensitivity levels. Proper setup ensures reliable protection against unauthorized access or tampering.

Testing and Verification
After installation, test the system thoroughly to ensure all features function correctly. Verify remote start operation, alarm triggers, and sensor responses. Consult the Viper 5706v manual for detailed testing procedures and troubleshooting guidance to confirm proper system performance.
Initial System Test
After installation, perform an initial system test to ensure all features function correctly. Start with a remote start test: press the remote start button and verify the engine starts and runs smoothly. Check the alarm system by triggering the sensors and confirming the siren activates. Test door lock/unlock functionality and ensure the LED status indicator reflects system status. Review the manual for specific testing procedures and troubleshooting guidance if any issues arise during verification.
Troubleshooting Common Issues
Common issues during Viper 5706v installation include remote start failure or alarm sensor malfunctions. Check wiring connections and ensure proper sensor alignment. If the remote start doesn’t activate, verify the Neutral Safety Shutdown circuit test. For alarm issues, review sensor adjustments and test trigger sensitivity. Refer to the system’s manual for detailed troubleshooting steps and solutions to resolve these problems effectively. Regular system checks can prevent recurring issues.
Maintenance and Upkeep
Regularly inspect the Viper 5706v system to ensure optimal performance. Clean sensors, update firmware, and test remote functionality. Schedule annual professional checks for long-term reliability. Download the manual for detailed maintenance procedures.
Regular System Checks
Perform regular system checks to ensure the Viper 5706v operates efficiently. Inspect sensors, wiring, and connections for damage or corrosion. Update firmware periodically to maintain functionality. Test remote start and alarm features to confirm proper operation. Clean sensors and adjust settings as needed. For detailed procedures, refer to the PDF manual. Regular checks prevent issues and ensure long-term reliability.
Updating Firmware and Software
Regularly update the Viper 5706v firmware and software to ensure optimal performance and security. Check the manufacturer’s website for the latest versions. Download updates using a computer and transfer them to the system via USB. Follow the instructions in the PDF manual for a smooth process. Updating ensures compatibility, fixes bugs, and enhances features. Contact Directed support at 1-800-753-0600 for assistance if needed.

Legal and Compliance Information
Ensure compliance with local regulations when installing the Viper 5706v. Proper installation by authorized personnel is required to maintain warranty validity and legal compliance. Refer to the PDF manual for details.
Local Regulations and Restrictions
Before installing the Viper 5706v, verify compliance with local laws and regulations. Some regions may restrict remote start functionality or require specific certifications. Ensure the system meets all applicable standards for your area. Failure to comply may result in legal consequences or void the manufacturer warranty. Contact local authorities or a certified installer for guidance. Refer to the PDF manual for additional details on regional compliance requirements.
Manufacturer Warranty and Support
The Viper 5706v is backed by a comprehensive manufacturer warranty, ensuring protection for your investment. Directed Electronics provides dedicated customer support for any inquiries or issues. For assistance, contact their U.S. support at 1-800-753-0600 or Canada at 1-800-361-7271. Register your product to activate warranty benefits. For detailed warranty terms and support options, refer to the PDF manual or visit the official Viper website.

Additional Resources
Download the Viper 5706v PDF manual for offline reference. Visit the official Viper website or forums for additional support, troubleshooting, and installation tips.
Downloading the PDF Manual
The Viper 5706v installation guide is available as a downloadable PDF manual, ensuring easy access to detailed instructions and troubleshooting tips. Visit the official Viper website or trusted platforms like ManualsLib or ManualsOnline to download the manual. The PDF includes 67 pages of comprehensive information, covering installation, operation, and maintenance. Simply search for “Viper 5706v installation guide PDF” and select a reliable source to download the file. This resource is essential for a successful installation. Download here.
Online Support and Community Forums
For additional assistance, visit the official Viper website or Directed support page for online resources and FAQs. Community forums like Reddit and specialized car audio groups offer valuable insights and troubleshooting tips from experienced users. YouTube also hosts video guides and tutorials for the Viper 5706v. Contact Directed support at 1-800-753-0600 (U.S.) or 1-800-361-7271 (Canada) for professional help. Engage with these resources to resolve installation challenges and optimize your system. Visit support page.